Handle notifications in your React application (TypeScript) using Redux toolkit and use a custom Redux middleware to handle API responses
Showing API success and error notifications in React with Redux Toolkit and a custom Redux middleware that inspects API responses.
- #redux-toolkit
- #redux-middleware
- #react
- #material-ui
- #typescript
If you’re following the series, you already have a React application and a Express backend which handles authentication. But, we still haven’t implemented a method to show the users any error / success messages in the application.
Here we’re going to implement showing notifications for frontend validation errors as well as API response errors. You’ll need a frontend application which uses Redux Toolkit to handle the state, with / without APIs. Refer this if you need a start. Let’s start!
We’re using redux-toolkit to manage the state of the notifications; to handle if it is open, the message it shows and the type of the message. Assuming you have already setup redux, create a notificationSlice.ts under slices folder and add below code. We’re creating two reducers to handle the show / hide notifications.
import { PayloadAction, createSlice } from "@reduxjs/toolkit";

export enum NotificationType {
  Success = "success",
  Error = "error",
  Warning = "warning",
  Info = "info",
}

type Notification = {
  open: boolean;
  message: string;
  type: NotificationType;
};

type ShowNotification = Omit<Notification, "open">;

const initialState = {
  open: false,
  message: "",
  type: NotificationType.Success,
};

const notificationSlice = createSlice({
  name: "notification",
  initialState,
  reducers: {
    showNotification: (state, action: PayloadAction<ShowNotification>) => {
      state.open = true;
      state.message = action.payload.message;
      state.type = action.payload.type;
    },
    hideNotification: (state) => {
      state.open = false;
      state.message = "";
    },
  },
});

export const { showNotification, hideNotification } = notificationSlice.actions;
export default notificationSlice.reducer;
We need to add this to the store as well.
// Other imports here
import notificationReducer from "./slices/notificationSlice";

const store = configureStore({
  reducer: {
    auth: authReducer,
    user: userReducer,
    notification: notificationReducer,
  },
});

// Rest of the code here
Let’s create the notification bar component. Create a components folder under src, then a notification folder, and then NotificationBar.tsx as below.
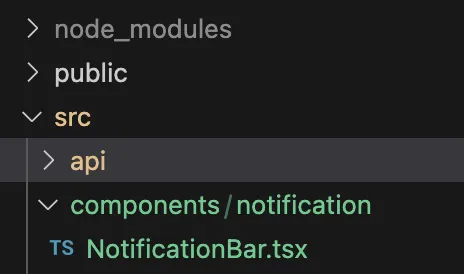
Folder / file structure for components
I’m using MUI Snackbar for this and below is an updated version of one of their examples.
import * as React from "react";
import Stack from "@mui/material/Stack";
import Snackbar from "@mui/material/Snackbar";
import MuiAlert, { AlertProps } from "@mui/material/Alert";
import { useAppSelector } from "../../hooks/redux-hooks";
import { hideNotification } from "../../slices/notificationSlice";
import { useAppDispatch } from "../../hooks/redux-hooks";

const Alert = React.forwardRef<HTMLDivElement, AlertProps>(function Alert(
  props,
  ref
) {
  return <MuiAlert elevation={6} ref={ref} variant="filled" {...props} />;
});

const NotificationBar = () => {
  const dispatch = useAppDispatch();
  const { open, message, type } = useAppSelector((state) => state.notification);

  const handleClose = (
    event?: React.SyntheticEvent | Event,
    reason?: string
  ) => {
    if (reason === "clickaway") {
      return;
    }

    dispatch(hideNotification());
  };

  return (
    <Stack spacing={2} sx={{ width: "100%" }}>
      <Snackbar
        open={open}
        autoHideDuration={6000}
        onClose={handleClose}
        anchorOrigin={{ vertical: "top", horizontal: "center" }}
      >
        <Alert onClose={handleClose} severity={type} sx={{ width: "100%" }}>
          {message}
        </Alert>
      </Snackbar>
    </Stack>
  );
};

export default NotificationBar;
Here we retrieve open, message and type of notification state and use them in our JSX to handle the status (open / not), message and type of the notification. We also dispatch hideNotification() action in handleClose() function, so that if the user clicks on the close icon in the notification, the notification is closed. If we don’t close it, it automatically calls onClose() function after autoHideDuration (6000 milli seconds).
Since we’re showing only one notification at a time, and since we’re using this globally (in every page), we can add this component to our App.tsx file.
// Other imports here
import NotificationBar from "./components/notification/NotificationBar";

function App() {
  return (
    <>
      <NotificationBar />
      <Routes>
        {/* Routes here */}
      </Routes>
    </>
  );
}

export default App;
Now let’s move into the usages of this notification bar. One usage is showing validation errors in login and register pages. Currently our Login page handleLogin() function looks like below.
const handleLogin = async () => {
    // This is only a basic validation of inputs. Improve this as needed.
    if (email && password) {
      try {
        await dispatch(
          login({
            email,
            password,
          })
        ).unwrap();
      } catch (e) {
        console.error(e);
      }
    } else {
      // Show an error message.
    }
};
Let’s show an error notification if email / password is not provided (in else block).
import {
  showNotification,
  NotificationType,
} from "../slices/notificationSlice";

const handleLogin = async () => {
    // This is only a basic validation of inputs. Improve this as needed.
    if (email && password) {
      try {
        await dispatch(
          login({
            email,
            password,
          })
        ).unwrap();
      } catch (e) {
        console.error(e);
      }
    } else {
      dispatch(
        showNotification({
          message: "Please provide email and password",
          type: NotificationType.Error,
        })
      );
    }
};
Now you can check if this works in the hosted application. You can do the same for the registration page as well.
import {
  showNotification,
  NotificationType,
} from "../slices/notificationSlice";

const handleRegister = async () => {
    // This is only a basic validation of inputs. Improve this as needed.
    if (name && email && password) {
      try {
        await dispatch(
          register({
            name,
            email,
            password,
          })
        ).unwrap();
      } catch (e) {
        console.error(e);
      }
    } else {
      dispatch(
        showNotification({
          message: "Please fill out all the required fields",
          type: NotificationType.Error,
        })
      );
    }
};
Now we can move into handling API response failures. You’ll have to refer to the previous article for this part, or if you already handle API requests using Redux Toolkit features, it’ll be fine too.
Currently, we don’t do any error handling inside the thunk action creators where we initiate the requests (login, register, logout, getUser). We only set the error to our state in the extra reducers and that’s it.
But inside the components where we dispatch those actions, we call unwrap() to retrieve any errors occurred and use a try-catch block to handle it in the component level. Here, we can dispatch the showNotification action inside the catch block. This is a good approach if you need to handle errors in the component level. But when the application grows, this might be difficult to handle.
We can handle the errors in a more generalized way, where we initiate the requests. That way, we can handle the responses in a more centralized way (we don’t need to handle errors in component level). Also, I’m hoping to send meaningful error messages from the backend for known failures, therefore I need to show them as it is to the user. This is what we’re going to do here. We’ll show notifications for both success and error scenarios.
This is what our login action creator in authSlice.ts looked earlier,
export const login = createAsyncThunk("login", async (data: User) => {
  const response = await axiosInstance.post(`${BACKEND_BASE_URL}/login`, data);
  const resData = response.data;

  localStorage.setItem("userInfo", JSON.stringify(resData));

  return resData;
});
Let’s update it as follows.
import { AxiosError } from "axios";
import { showNotification, NotificationType } from "./notificationSlice";
// Rest of the code here

export const login = createAsyncThunk(
  "login",
  async (data: User, { rejectWithValue, dispatch }) => {
    try {
      const response = await axiosInstance.post("/login", data);
      const resData = response.data;

      localStorage.setItem("userInfo", JSON.stringify(resData));
      dispatch(
        showNotification({
          message: resData.message || "Success",
          type: NotificationType.Success,
        })
      );

      return resData;
    } catch (error) {
      if (error instanceof AxiosError && error.response) {
        const errorResponse = error.response.data;
        dispatch(
          showNotification({
            message: errorResponse.message,
            type: NotificationType.Error,
          })
        );
        return rejectWithValue(errorResponse);
      }
      dispatch(
        showNotification({
          message: "An error occurred",
          type: NotificationType.Error,
        })
      );

      throw error;
    }
  }
);
As you can see, we try the request in try block, and it it’s a success, we dispatch showNotification action to show a success message. If there’s an error, we catch it in the catch block.
When we receive a failed response, it can be either a one we handled in the backend, or it can be some other error such as a connection failure. Since we know the format of the error responses we return, we can check for them using a if block as above. If it is a error response we sent, we show the message sent from the backend. Otherwise, we show a general error (“An error occurred”).
When returning / throwing the error, if we have an error message we sent from the backend, I need to pass that to the rejected action (there’s no usecase for this for the moment). If we just throw the error received from catch block, we can’t extract those information. For that, we can use rejectWithValue() from redux-toolkit, it’s a function we can use to return an error response with a defined payload. Whatever payload we pass to this function, we can access in the payload of the rejected action. We can do something like below in login rejected case.
// Define type at the top
type ErrorResponse = {
  message: string;
};

// Rest of the code here

.addCase(login.rejected, (state, action) => {
  state.status = "failed";

  if (action.payload) {
    state.error = (action.payload as ErrorResponse).message || "Login failed";
  } else {
    state.error = action.error.message || "Login failed";
  }
})
Now, you can do the changes we did to login() earlier, to all the other thunk action creators (register, logout, getUser). But as you can see, this results in code duplication, and when our application grows, it’ll be difficult to handle this in every case.
One of the simple solutions for this is, creating a custom middleware for the redux store. When we use this middleware, every action will call this middleware and if the conditions match, it will perform any actions we need to dispatch. Adding custom middleware causes additional overhead, but since this is a simple one, we can go ahead with this solution.
I included the middleware file inside the api folder, but it is up to you. Create a middleware.ts file and include the following.
import { Middleware } from "@reduxjs/toolkit";
import {
  showNotification,
  NotificationType,
} from "../slices/notificationSlice";

export const axiosMiddleware: Middleware =
  ({ dispatch }) =>
  (next) =>
  async (action) => {
    if (action.type.endsWith("/rejected")) {
      const errorMessage = action.payload?.message || "An error occurred!";

      dispatch(
        showNotification({
          type: NotificationType.Error,
          message: errorMessage,
        })
      );
    } else if (action.type.endsWith("/fulfilled")) {
      const successMessage = action.payload?.message || "Sucess!";

      dispatch(
        showNotification({
          type: NotificationType.Success,
          message: successMessage,
        })
      );
    }

    return next(action);
  };
If the action type ends with /rejected, meaning the request is failed, we retrieve the error message if any, and show error notification. If the request was successful (/fulfilled), then we show a success notification. This middleware centralizes the notification handling for the API request responses. We need to tell the store to use this middleware as below.
import { axiosMiddleware } from "./api/middleware";
// Rest of the imports here

const store = configureStore({
  reducer: {
    auth: authReducer,
    user: userReducer,
    notification: notificationReducer,
  },
  middleware: (getDefaultMiddleware) =>
    getDefaultMiddleware().concat(axiosMiddleware),
});

// Rest of the code here
Now, we don’t need all the handling we did in the login() action creator. But we still need to pass the payload we receive from the error response, to the middleware (note the rejectWithValue() in catch block). Update login() as below.
export const login = createAsyncThunk(
  "login",
  async (data: User, { rejectWithValue }) => {
    try {
      const response = await axiosInstance.post("/login", data);
      const resData = response.data;

      localStorage.setItem("userInfo", JSON.stringify(resData));

      return resData;
    } catch (error) {
      if (error instanceof AxiosError && error.response) {
        const errorResponse = error.response.data;

        return rejectWithValue(errorResponse);
      }

      throw error;
    }
  }
);
You can update other ones in the same manner. Below is the final code for the authSlice.ts. We don’t actually use error state we set inside the extra reducers, but I’m keep it as this for the moment.
import { createSlice, createAsyncThunk, PayloadAction } from "@reduxjs/toolkit";
import axiosInstance from "../api/axiosInstance";
import { AxiosError } from "axios";

type User = {
  email: string;
  password: string;
};

type NewUser = User & {
  name: string;
};

type UserBasicInfo = {
  id: string;
  name: string;
  email: string;
};

type UserProfileData = {
  name: string;
  email: string;
};

type ErrorResponse = {
  message: string;
};

type AuthApiState = {
  basicUserInfo?: UserBasicInfo | null;
  userProfileData?: UserProfileData | null;
  status: "idle" | "loading" | "failed";
  error: string | null;
};

const initialState: AuthApiState = {
  basicUserInfo: localStorage.getItem("userInfo")
    ? JSON.parse(localStorage.getItem("userInfo") as string)
    : null,
  userProfileData: undefined,
  status: "idle",
  error: null,
};

export const login = createAsyncThunk(
  "login",
  async (data: User, { rejectWithValue }) => {
    try {
      const response = await axiosInstance.post("/login", data);
      const resData = response.data;

      localStorage.setItem("userInfo", JSON.stringify(resData));

      return resData;
    } catch (error) {
      if (error instanceof AxiosError && error.response) {
        const errorResponse = error.response.data;

        return rejectWithValue(errorResponse);
      }

      throw error;
    }
  }
);

export const register = createAsyncThunk(
  "register",
  async (data: NewUser, { rejectWithValue }) => {
    try {
      const response = await axiosInstance.post("/register", data);
      const resData = response.data;

      localStorage.setItem("userInfo", JSON.stringify(resData));

      return resData;
    } catch (error) {
      if (error instanceof AxiosError && error.response) {
        const errorResponse = error.response.data;

        return rejectWithValue(errorResponse);
      }

      throw error;
    }
  }
);

export const logout = createAsyncThunk(
  "logout",
  async (_, { rejectWithValue }) => {
    try {
      const response = await axiosInstance.post("/logout", {});
      const resData = response.data;

      localStorage.removeItem("userInfo");

      return resData;
    } catch (error) {
      if (error instanceof AxiosError && error.response) {
        const errorResponse = error.response.data;

        return rejectWithValue(errorResponse);
      }

      throw error;
    }
  }
);

export const getUser = createAsyncThunk(
  "users/profile",
  async (userId: string, { rejectWithValue }) => {
    try {
      const response = await axiosInstance.get(`/users/${userId}`);
      return response.data;
    } catch (error) {
      if (error instanceof AxiosError && error.response) {
        const errorResponse = error.response.data;

        return rejectWithValue(errorResponse);
      }

      throw error;
    }
  }
);

const authSlice = createSlice({
  name: "auth",
  initialState,
  reducers: {},
  extraReducers: (builder) => {
    builder
      .addCase(login.pending, (state) => {
        state.status = "loading";
        state.error = null;
      })
      .addCase(
        login.fulfilled,
        (state, action: PayloadAction<UserBasicInfo>) => {
          state.status = "idle";
          state.basicUserInfo = action.payload;
        }
      )
      .addCase(login.rejected, (state, action) => {
        state.status = "failed";
        if (action.payload) {
          state.error =
            (action.payload as ErrorResponse).message || "Login failed";
        } else {
          state.error = action.error.message || "Login failed";
        }
      })

      .addCase(register.pending, (state) => {
        state.status = "loading";
        state.error = null;
      })
      .addCase(
        register.fulfilled,
        (state, action: PayloadAction<UserBasicInfo>) => {
          state.status = "idle";
          state.basicUserInfo = action.payload;
        }
      )
      .addCase(register.rejected, (state, action) => {
        state.status = "failed";
        if (action.payload) {
          state.error =
            (action.payload as ErrorResponse).message || "Registration failed";
        } else {
          state.error = action.error.message || "Registration failed";
        }
      })

      .addCase(logout.pending, (state) => {
        state.status = "loading";
        state.error = null;
      })
      .addCase(logout.fulfilled, (state, action) => {
        state.status = "idle";
        state.basicUserInfo = null;
      })
      .addCase(logout.rejected, (state, action) => {
        state.status = "failed";
        if (action.payload) {
          state.error =
            (action.payload as ErrorResponse).message || "Logout failed";
        } else {
          state.error = action.error.message || "Logout failed";
        }
      })

      .addCase(getUser.pending, (state) => {
        state.status = "loading";
        state.error = null;
      })
      .addCase(getUser.fulfilled, (state, action) => {
        state.status = "idle";
        state.userProfileData = action.payload;
      })
      .addCase(getUser.rejected, (state, action) => {
        state.status = "failed";
        if (action.payload) {
          state.error =
            (action.payload as ErrorResponse).message ||
            "Get user profile data failed";
        } else {
          state.error = action.error.message || "Get user profile data failed";
        }
      });
  },
});

export default authSlice.reducer;
Try out different scenarios in the application UI and test if it works. I have updated my backend application a bit, in order to send user-friendly error messages and to use the custom error handler middleware we created in the backend. You can view the updated backend code here.
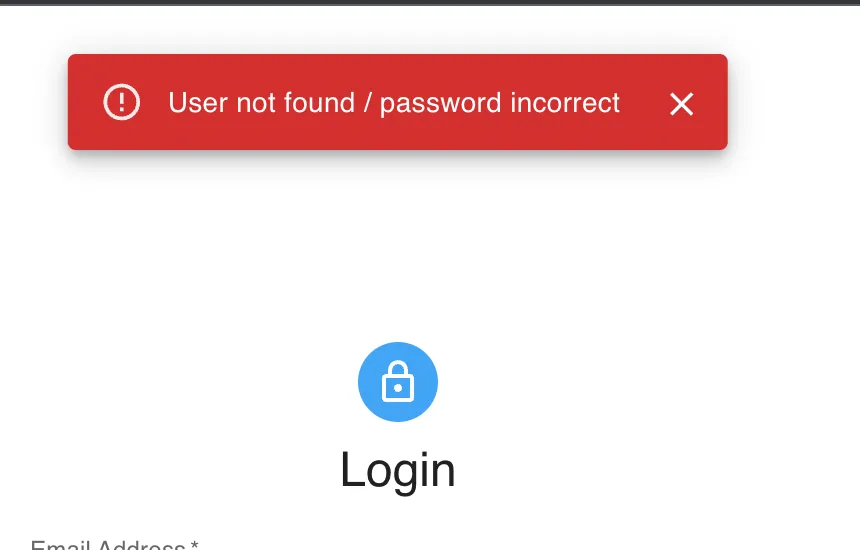
Error message notification with message received from backend
Now you don’t need try-catch block or unwrap() in the component level. The updated handlers are as below for login, register and logout scenarios.
const handleLogin = async () => {
    // This is only a basic validation of inputs. Improve this as needed.
    if (email && password) {
      dispatch(
        login({
          email,
          password,
        })
      );
    } else {
      dispatch(
        showNotification({
          message: "Please provide email and password",
          type: NotificationType.Error,
        })
      );
    }
  };
const handleRegister = async () => {
// This is only a basic validation of inputs. Improve this as needed.
if (name && email && password) {
dispatch(
register({
name,
email,
password,
})
);
} else {
dispatch(
showNotification({
message: "Please fill out all the required fields",
type: NotificationType.Error,
})
);
}
};const handleLogout = async () => {
await dispatch(logout());
navigate("/login");
};You can view the full implementation for frontend application up to now here.
Follow me and stay tuned! If you have any questions, let me know in the comments!
Next Steps
We’ll handle authorization for the frontend and backend applications, using Role Based Access Control.
Previous Steps
Create a react app with Register and Login pages
Create a simple React app (TypeScript) with Login / Register pages using create-react-app
Manage your React application state using Redux Toolkit
Manage your React (TypeScript) application state using Redux Toolkit
Create a Express backend application to handle authentication
Create a backend application using Express (TypeScript) and handle authentication
Originally published on Medium.